
Fundamentals of Prosthetics
When it comes to the fundamentals of dental prosthetics, the possibilities are virtually, limitless. Today, dental prosthesis reach far beyond the simple replacement of a missing tooth or covering up tooth defects. While this is and always will be the objective of the prosthesis itself, there is no modern dentistry without implantology – the procedures that involved both tooth replacement and restoration by embedding dental implants.
Whether you're an experienced clinician or a novice, if you're new to the world of oral implantology, it's important to understand the critical steps involved in the procedure. No less important, is that the procedure also results in a satisfied patient, now with an attractive, esthetically-pleasing smile.

The prosthetic stage should be considered at a very early stage of treatment planning, long before the implants are placed in the patienwhent's mouth. Therefore, we will not focus on implant placement surgery, but rather on the planning that precedes it, and the restorative treatment that follows.
Implant Restoration Procedure
Dental implant restoration procedure consists of the following steps:
- Prosthetic Planning - Taking impressions, preparing a diagnostic wax-up, and a surgical guide
- Implant placement – In an optimal 3D position, implant placement is based on the diagnostic wax-up and determined by the surgical guide
- Patient rehabilitation – Creating dental restorations
Prosthetic Planning
Pre-surgical prosthetic planning is best defined as the process of accumulating diagnostic information to determine which course of treatment should be considered for the patient. Prosthetic planning includes these steps:
- Anamnesis and diagnostic imaging (x-rays and tomography) to check clinical aspects and esthetics, using photographs and videos
- Evaluate static and dynamic occlusal contact marks, e.g. evaluate the mouth opening
- Take primary impressions
- Record the relation of maxillary structures to the cranium, also referred to as the maxillo-cranial record, and intermaxillary relations (between maxilla and mandible), or the intermaxillary record. Particularly in complex restorative cases, an articulator should be used to reproduce and evaluate the intermaxillary relations, and create an occlusal harmony.
- 3D evaluation of mounted models (e.g. missing teeth, condition of remaining teeth, condition and profile of hard and soft tissues, occlusion, and biomechanical evaluation of future restorations).
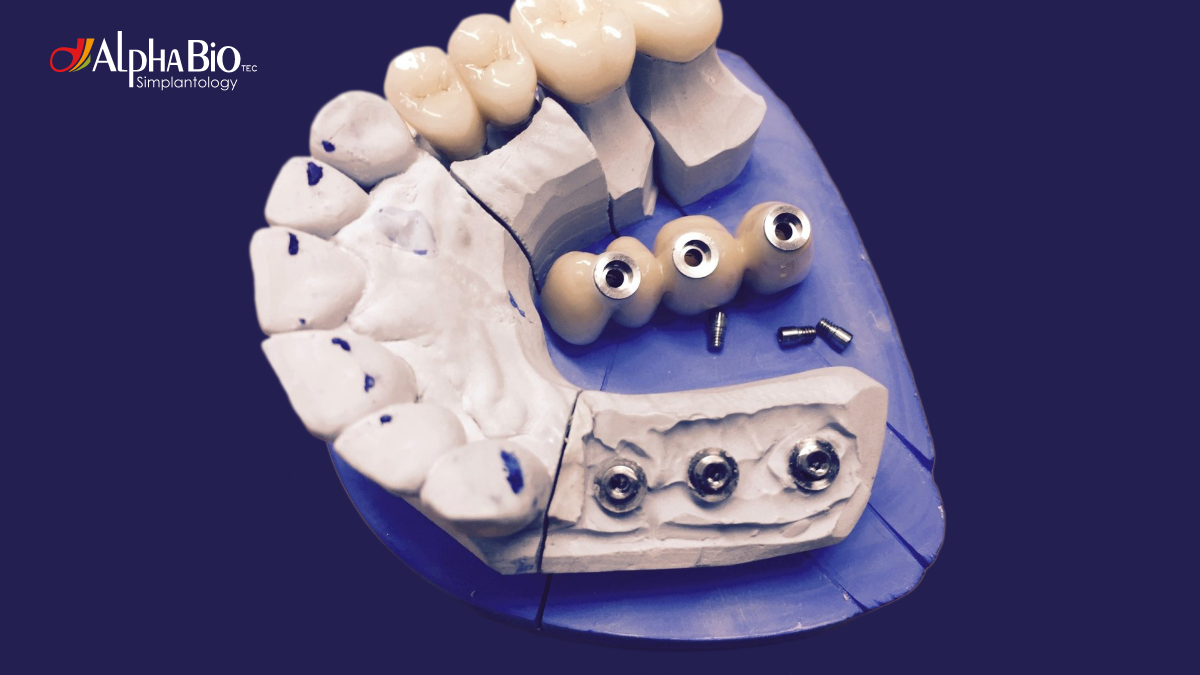
- Diagnostic wax-up – At this stage, the correct type of restoration is determined, and the missing teeth are designed using wax on plaster models or alternatively, using a CAD software. The purpose of a diagnostic wax-up is to achieve a comprehensive understanding of the type and design of the restoration required for each case.
* Based on the diagnostic wax-up, you can also determine the number of implants and their positions, best implant insertion axis, correct implant diameter, size of the crowns and bridges, and the crown-implant relations
* When planning the implant distribution along the dental arch, the type of ridge (U-shaped, V-shaped, or rounded) should be considered. The A-P spread (the distance between the most anterior and the most posterior implant) defines the leverage of the restoration, whereby, the greater the distance, the larger the resistance arm.
* Evaluation of the gingivo-occlusal and interproximal space – This evaluation enables you to determine the diameter of implant to be placed, as well as the size of the future prosthetic teeth. Minimum gingivo-occlusal space is 5mm, while the ideal space is 7mm (for molars). The minimal mesiodistal space where an implant with a restoration can be placed, is 7mm.
* This is also the point at which you determine the interproximal contacts and aim to design the underlying interdental papillae. There is a direct relationship between the distance from the contact area to the alveolar crest and the formation of interdental papilla (the lesser the distance, the better are the chances for papilla formation). - Final treatment planning
- Production of radiological, tomographic, surgical, and prosthetic guides
Prosthetic Stage
In cases of immediate loading, the soft tissues stabilize and conform from the moment of placing the implant, a temporary abutment, and temporary teeth. According to the traditional approach, after the implantologist has confirmed the implant osseointegration, an implant uncovering surgery takes place. This usually occurs 3-4 months after the implants were placed in the maxilla, and 3 months after mandibular placement. A healing abutment is then placed, and it's recommended that you wait 15-20 days for the soft tissues to become stable.
There are two main types of implant prosthesis – provisional and definitive.
Provisional prosthesis are placed either in the implant-placement surgery stage. This technique is referred to as immediate provisionalization for a single tooth or immediate loading for multiple tooth replacement, or in the second (uncovering) surgery stage, instead of placing a healing abutment.
Provisional prosthesis can be screw or cement-retained, and can be made from titanium or PEEK (polyetheretherketone).
In immediate loading, the provisional prosthesis is placed on an implant without reaching occlusal contact with the antagonist teeth. Immediate loading is performed to meet the patient's aesthetic requirements. It can be used in implants with good primary stability, especially with a single tooth or short-span bridges. In some cases, real immediate occlusal loading can be performed, where there will be contact between provisional and antagonist teeth to enable proper mastication, e.g. in full-arch implant restorations. For immediate loading, the implant should achieve suitable primary stability exceeding 35 Ncm.
Definitive prosthesis can also be screw or cement-retained. Cement-retained prosthesis will be used in cases with adequate gingivo-occlusal and interproximal spaces (at least 7mm), and unfavorable implant angulation. In cases with lower spaces, a screw-retained prosthesis is sufficient, however, in this case, the angulation of the implant should be favorable to enable aesthetic positioning of the screw channel (on the occlusal or lingual surface of the restoration).
For cement-retained prosthesis, machined (straight or angled) or castable (UCLA) abutments can be used. Straight machined abutments are used when the implant emergence is ideal. In cases where the emergence is not ideal, an angled abutment should be used to prevent the crown from over-contouring. The most widely-used angled abutments have angles of 15° or 25°, however, a new 35° angled abutment is also available.

The fundamental difference between machined and cast abutments is the adaptation with the prosthetic implant base. Machined abutments offer very good adaptation and fit, providing excellent marginal seal, and a very good transmission of forces. Cast abutments do not have the same precision and fit, and they generate larger gaps and deficient force transmission, particularly when cast in Ni-Cr alloy. To reduce the lack of precision in cast abutments, abutments with a Co-Cr metal base or multi-unit abutments can be used. Similarly, multi-unit abutments provide perfect adaptation and adjustment, as they are machined. Further, multi-unit abutments take the interface with the cast metal above the gingiva, thereby lowering the risk of soft tissue inflammation.
Passivity is a key property of prosthetic structures, essentially allowing them to sit correctly on the implants without exerting permanent tension on the implant bone interface. If the prosthetic structure lacks passivity, the following complications may arise – bone resorption, soft tissue inflammation, lack of adaptation, and loosening of the prosthetic fixation screws. For passive adaptation, machined prosthetic elements or metal-base castable abutments should be used. In restoration involving multiple implants, the most common technique to obtain passivity is to segment multiple metal structures, and then weld them. Dividing the prosthesis into a mesostructure and suprastructure reduces the possibility of dimensional variation due to volume, therefore, increasing passivity when installing the prosthesis.
When it comes to improving implantology procedures, the overall patient experience, and the esthetic results, proper prosthetic restoration planning and implementation is essential.
As we consistently strive for better results based on enhanced diagnoses and techniques, as professionals, we continue to learn – and we never stop learning. Oftentimes, it's the most challenging cases that become our very best teachers.
.png)
.png)
.png)

.jpeg)